Wednesday, March 28, 2012

Bachman Lake
This week, my sunrise quest has taken me to Bachman Lake.  This lake is in Dallas off of Northwest Hwy and Lemmon Ave. near Love Field airport.  All of my pictures this day, I took in HDR.  When I woke up, I knew it was going to be a great sunrise, so I wanted to make sure to capture the full range of color that I knew would be there.


 As I go deeper into the year on this sunrise project, I find myself working harder to keep it new and challenging.  By far, the most challenging aspect is finding new spots from which to shoot.

Other than that, I have used different techniques, including HDR, I've forced myself to shoot from a lower perspective and I've tried to look for new interesting subjects.  My favorite so far has been reflections on water.
I look forward to going back to Bachman Lake during the day, because the landing strip for Love Field airport is just beyond the lake.  From what I hear, the planes come right over the lake to land.  That would make for some interesting pictures.


Now that the Blue Bonnets are starting to bloom, those may make for an interesting sunrise.

Until next time...

Sunday, March 25, 2012

It's a Macro World After All

For those that don't know, a macro lens is a lens that allows you to get closer with your focus of an object than other lenses.  It doesn't necessarily magnify the object, it just allows you to get closer.  A macro lens serves many uses, possibly the most common which is bug and insect photography.

I rented a macro lens for the weekend from www.prophotorental.com.  I chose this website over others because it offers free shipping both directions; a huge plus.  The lens I rented is a Canon EF-S 60mm F/2.8 lens.  This lens has a better than expected focal range and with the small F-Stop number, you have the availability to blur out a lot of your background.

 I decided to go to two places to try out the lens.  The first was at the Butterfly House at The Discovery Gardens.  Beautiful place with a lot of beautiful butterflies.  One caveat:  It is very humid!  My wife and I were only able to make it 30 minutes.

The lens performed like a champ.  It gives a great crisp focus, is lightweight and as I said earlier, has a very decent focal range considering it is a fixed 60mm focal length.
 

There was a great variety of color in the butterflies.  There was one that looked like an owl's eye and feathers as its camouflage.  The large white one to the right landed and seemed to enjoy being on camera.  It sat there for about 5 minutes, allowing me to get all the pictures of it that I wanted.

You can find more information at www.texasdiscoverygardens.org/.  It is located at Fair Park, you get free parking and with an admission of $8 for adults, you can't beat it.

 The second place I went to, to test the lens was the Dallas Arboretum.  This is an incredibly beautiful place.  Flowers and color everywhere.  There is something there for the whole family.

This first picture is a great show of how great a macro lens can be.  If you look carefully, you can see a spiderweb in the upper right corner of the picture.  I didn't even notice that it was there until I was working on the pictures at home.
 I really like the detail that you can get with the flowers.  I shot all of these in RAW format.  First, I wanted to get more practice shooting in RAW, but second, the Arboretum is a particularly difficult place to shoot, because you are constantly moving from shadows to bright sunlight.  You can only adjust the camera so much before you waste your entire day.  With RAW, I was able to go back and tweak the images as I saw fit.
 This is my favorite picture.  My main goal with going to the Arboretum was to get a picture of a bee on a flower.  I think this one came out very well.  The color contrast of the bee against the flower is great and with the macro lens, you can see the little hairs on the bee.


Earlier, I mentioned that with the aperture of this lens being so low, (F/2.8), you can have a very narrow depth of field, blurring out the background.  Of all the pictures I took, that is no more evident than this picture.  I highly recommend checking out the Dallas Arboretum before it gets too hot.  You can get more information from their website at:  www.dallasarboretum.org/.  At $15 per adult, it is a bit more pricey, but there is so much to do there, you really can spend an entire day.  They allow you to bring in food, so plan a picnic and enjoy the beauty.


As I always mention, look around your city and see what there is to do.  I find that when you live some place, you don't really take the time to do the "touristy" things.  Explore and enjoy!

Until next time...

Wednesday, March 21, 2012


The Sunrise That Wasn't.

 Sunday is my weekly sunrise shoot day.  Luckily, with the time change, the sun comes up an hour later, so I get to sleep a little bit more.  As I've said over the last few weeks, the weather has been sort of hit and miss and this morning was one of the misses.  It was very cloudy and the sun was blocked out.  However, as long as it is not raining, I will be out with my camera.


 In looking at the above picture and the picture to the right of this text, this is a great representative of the detail that you get with HDR photography.  The above picture is the HDR shot and you can see so much more detail in the clouds than you can in the picture to the right.  I didn't notice that until I put these two pictures together.


This week's sunrise pictures were taken at White Rock Lake.  I am developing an affinity for piers.  I think that they're a great subject for photography.  Plus, I love the song, "Sitting on the Dock of the Bay", by Otis Redding.


As I said a couple of blog posts ago, White Rock Lake is a great place to visit.  I plan on going back when I get another good sunrise.  I also have other plans for photo shoots there.  We'll see what the week holds in terms of photographic opportunities.  I'm always looking for new subjects and new challenges.

Until next time...


Monday, March 19, 2012

Raw

There is a quality setting on DSLR cameras called RAW.  Simplified, this is a setting that takes in much more information about a picture than normal settings or JPEGs.  This file is about four times the size of a JPEG image.  The benefits are many.  When you pull the file into software, in my case, Adobe Photoshop Elements 9, you have almost complete control over the image.  Other than correcting a blurry picture, you have the ability to correct a lot of elements:  White Balance, Exposure, Contrast, Brightness, etc., etc.  With this control, you can really save any picture from almost great, to downright awful.

I went back out to Breckenridge Park in Richardson, TX a few nights ago after work to get some shots.  By the time I got there, the sun was pretty much gone.  Prior to then, I had tried shooting in RAW, but had never been able to convert the files back to JPEGs.  (JPEGs are the easiest file type to use, post production)  I decided this was a great time to finally learn.  I shot for about an hour in RAW with the understanding that if I could not figure out how to convert the files, I would have wasted my time.

I went home and figured out how to convert the files and I was pleasantly surprised.   I still have a ways to go in perfecting the fine tuning, but as you'll see below, the benefits of shooting in RAW speak for themselves.  Now, a bit of a warning.  I can't vouch for the composition of the pictures.  It's kind of hard to line up a picture in pitch blackness.  Other than that, please enjoy.


 These pictures were taken in virtually darkness.  The picture on the left is how it came out of the camera.  The picture on the right is after I processed it through Photoshop Elements.


As you can see, you have so much control to be able to take a ruined picture and with enough time and practice, make it look very nice.


There are many practical applications where shooting in RAW will help you.  The first is with high speed shooting.  I think back to when I was trying to take pictures of ducks flying.  I needed a fast shutter speed, but with a fast shutter speed comes less light hitting the sensor, resulting in a darker picture.  Shooting in JPEG, you sacrifice speed for light and end up with blurry pictures.  In RAW, you can speed up your shutter and be able to correct the exposure in Photoshop.

The second is with my cousin's wedding coming up this summer.  In July, chances are, the day will be very sunny.  With lots of light, you run the risk of losing details, particularly in the dress.  Also, when the reception moves indoors, you have to deal with often times, not so great lighting conditions.  Shooting in RAW will allow me to worry about shutter speed and composition to avoid blur and be able to fix color later.  Much of the shooting I have been doing over the last few months has been practice in preparation for my cousin's wedding.  I want to do the best I can for them.


So, that is my introduction of RAW shooting.  I hope that you've been able to see the excitement I felt with learning this application.

Until next time...

Saturday, March 17, 2012

Shutter Speed and Motion


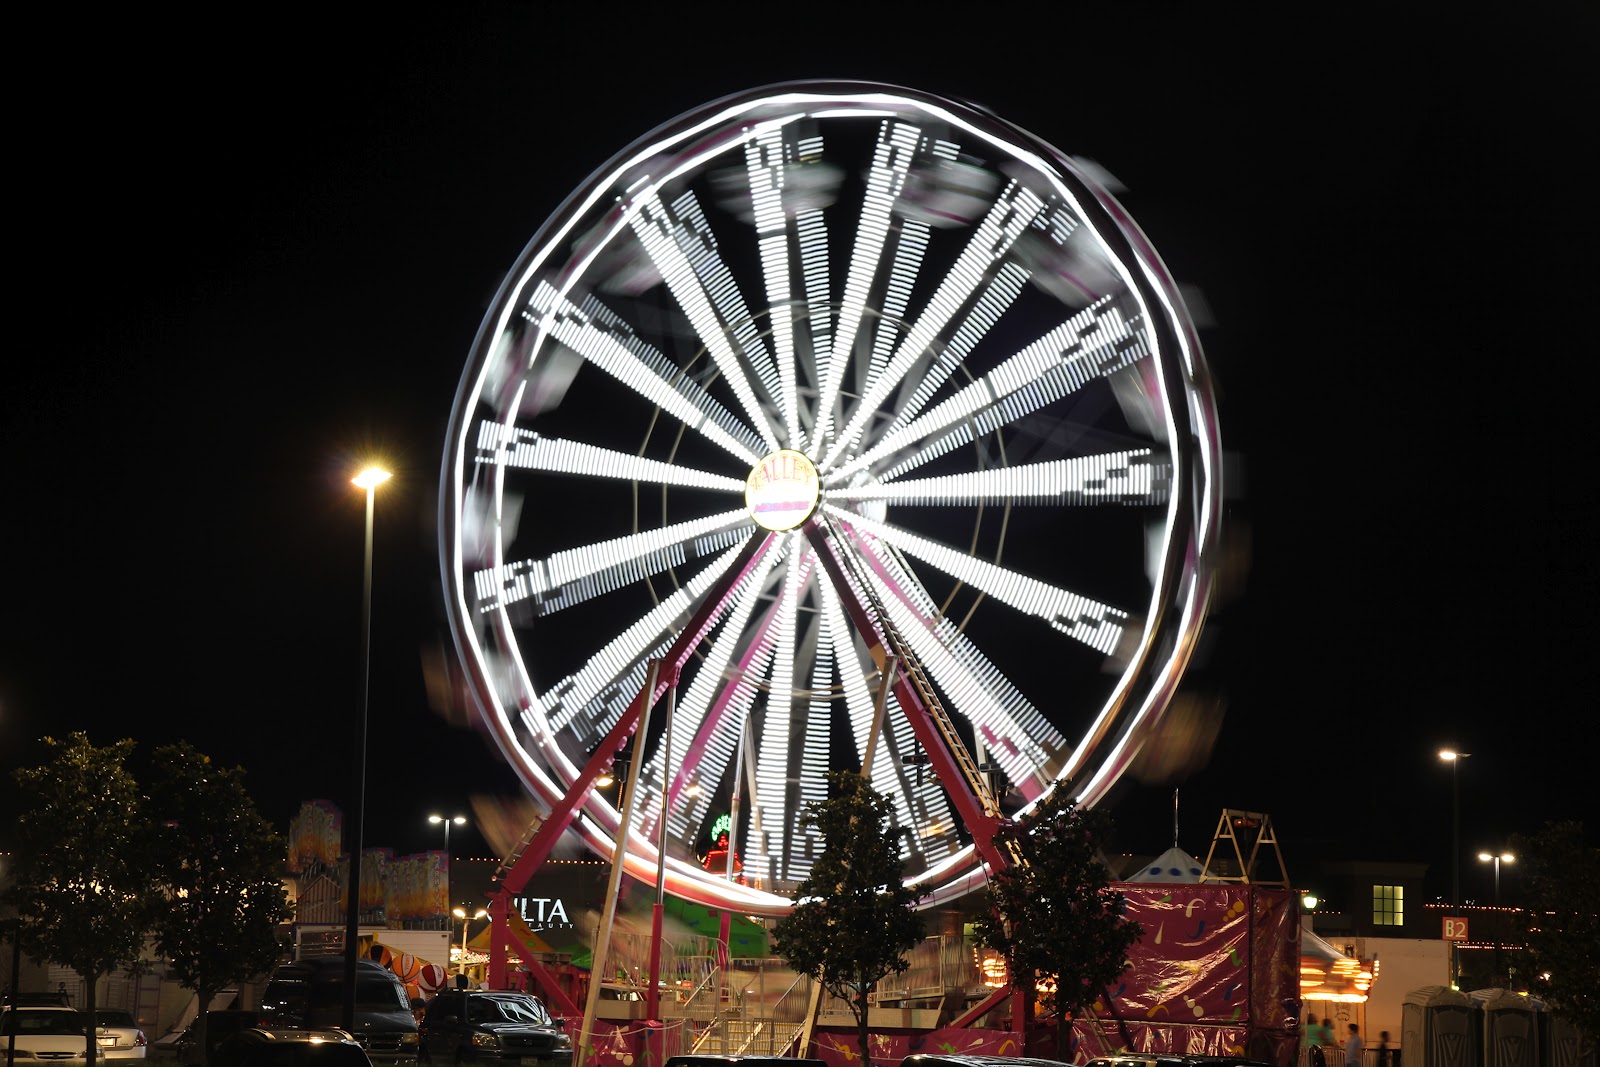
As the title implies, this update is going to talk about shutter speed and how it affects the perception of motion.  With DSLR cameras, you have the option to speed up and slow down the shutter speed.  By doing this, you affect how motion shows up in your pictures.  By leaving the shutter open a long time, the camera sensor captures any movement while the shutter is open, thus causing a blur.  Intentional blur can really make a picture look nice.  Flowing water is a popular subject for motion blur.  My pictures in this update capture motion blur, but I'll get into that later.

By speeding up the shutter, you are freezing motion.  Individual drops of water and action sports do well when using a fast shutter speed.  You lessen your chances of blur and you end up with nice crisp shots.  There are even techniques you can use to freeze motion even without using a super fast shutter.  One of the more popular ones is referred to as panning, where you follow your moving subject with the camera.  The result is that the moving object is in focus while your background is blurred.  But, more on that at a later date once I've had some time to try it.

Ok, so it's that time.  The time where I stop talking and post the pictures.


In these pictures you can see that the center of the wheel that doesn't move stays focused while the arms and gondolas blur.  The lights on the arms of the wheel flashed in different patterns which translated into different patterns with the long shutter speeds.  I think that was the most interesting part of these pictures.  In the last picture, I noticed the reflection of the wheel in this car's window.  I like reflections, whether on water or in glass, so I had to get this shot.


That's it for this update.  I've have a few more posts coming through over the next few days.  I have some night shots that I got last night and tomorrow is my weekly sunrise shoot.  I learned a lot about my camera last night and I think you'll enjoy what I ended up with.

Until next time...

Monday, March 12, 2012

Knowledge

I entitled this blog post as "Knowledge", because my ultimate goal whenever I go out to shoot, is to learn something.  Yesterday was supposed to be my Sunday sunrise shoot, but as Mother Nature giveth, Mother Nature taketh away.  I woke up to the sound of steady rain.  Don't get me wrong.  In Texas, rain is a beautiful thing, but it's not conducive for going out to shoot.

So, in honor of daylight savings time and being rained out, I went back to bed.  However, Mother Nature, being fair, offered me a beautiful sunset.  I decided to go out to White Rock Lake to shoot the sunset.  This is possibly the most iconic lake in Dallas.  It is great for sailing, fishing, picnicking, jogging, just about anything you can imagine.  The Dallas Arboretum sits on the southern bank of the lake.  White Rock Lake is easy to get to from Northwest Highway or Mockingbird Ln.

On to the learning.  One aspect of photography that helps to get a great exposure is to learn how to use your histogram.  The histogram looks sort of like a curved graph; sort of like a bell curve but with more peaks and valleys.  On one end, your highlights are represented.  On the other end, your lowlights.  The goal is to keep your graph from shooting up one side or the other.  Too far to the right and your picture will be too bright.  Too far to the left and your picture will be extremely dark.  My learning experience is that I found out how to pull up the histogram on my view screen.  I was able to adjust my histogram where I wanted it before I took the picture.  I am able to adjust this on Photoshop Elements, but getting right at the beginning helps prevent "Garbage in, Garbage Out".

The second thing I learned was completely by accident.  As I've said before, to shoot in HDR, you take 3 or more shots at different exposure levels and then combine them in HDR software.  I have been using a shutter release to take these three shots with three different pushes of the button.  Well, my shutter release has become damaged over time and it started acting up yesterday, firing uncontrollably and randomly.  I got tired of it, so I unplugged it and turned my camera on to a 2 second delay.  Waiting for the delay allows for the camera to shot shaking from me pressing the button.  To my surprise, the camera took all three pictures for me with one press of the button!  It is a time saver, but I will have to weigh that against the convenience of the shutter release.  The jury is still out on that one.

So enough of my ramblings, on to the pictures!

 This is a shot of a boat house with some docked sail boats.  I plan to go back out to the lake when the weather gets a little warmer to get shots of more boats with their sails up.


 This is on the east bank of White Rock Lake.  
There was only one sailboat with its sail up, but I was able to catch it.


 When I looked up the lake on Mapquest, I switched it to satellite view and saw the piers around the lake.  I thought that would make for some great pictures.  This is an HDR shot that I did some more work on with adjusting the settings.  You can really see the advantages of HDR technology in the planks of the pier.


One last shot of the sailboat.  This is a non HDR shot.  I like the reflection of the sun on the water with the sailboat sailing in to it.

Once again, the next few days are calling for rain, so I will find something to shoot indoors.

That is it for now.  Thank you for continuing to follow my blog.  You can also see more of my pictures on Facebook at 
www.facebook.com/marcusdavisphotography

Until next time...

Tuesday, March 6, 2012

Last Chance

The weather forecast for the Dallas area doesn't look too great for the next few days.  The weather channel is calling for rain all the way through Sunday.  With that in mind, even with the sky overcast, I figured this would be my last chance to go out and shoot for the next few days, so off I went.

I wanted to try to photograph with a wind theme in mind.  However, before I got off from work, the wind died down.  I went to the website for the City of Richardson and decided to go to Cottonwood Park off of Beltline Rd and Cottonwood Rd.  I have to say, this was a very nice park.  The city has done a great job with its parks system.  Also, Mother Nature decided to help me out by putting some nice color in the sky before I left.

I decided to learn to use my HDR software a little more.  With these pictures, once I merged the three shots, I went in and adjusted the fine tuning settings.  I think that they came out pretty well.

I especially love the black and white pictures.  Also, with the colors in the sky that I mentioned, the HDR technology really accentuates them.


1/80 Sec. Exp., 85mm, F/5.6, ISO 400
 I think this is one of the truest signs that spring is upon us.  There were a couple dozen ducklings swimming around the lake with their parents.  Even at this young age, these kiddos are fast.  The picture is not as in focus as I would like, but I had to include this picture.


1/30 Sec., Exp., 17mm, F/5, ISO 800
 This park had a rock formation separating two of its lakes.  I decided to climb up on it and take a low angle shot.  I like the trees poking out from the top of the rocks.


1/13 Sec. Exp., 80mm, F/5, ISO 400
I think this is my favorite photograph of all and it was completely by accident.  I was setting up for this shot; adjusting my zoom, focus, shutter speed etc. and as I pressed the shutter this father and son had walked into the shot.  What I think makes this shot work is that the son is jumping off the rock as the picture was being taken.  This is a great candid father and son moment.


Before I go, I wanted to take a moment to say that you should check out you local parks.  They are a great way to see nature and to get some exercise in the process.  Look for the Parks and Recreation section of your city's website and that will give you a great guide with which to start.

With the pending rain, I'll have to find something indoors to shoot later this week.  Any suggestions are greatly appreciated.

Until next time...